Part 2 – Design
19 Creating Engaging Concept Video Presentations
Diana Quinn
In a Nutshell
Key concept presentations are short, engaging video segments designed to introduce essential course concepts to students in an online learning environment. These videos, typically less than 6 minutes long, focus on presenting key ideas in a concise and captivating manner. They often feature the instructor’s face to create a more personal connection. This chapter provides step-by-step instructions on creating your own key concept presentations, ensuring they are accessible and easy to navigate.
Why Does it Matter?
As university education increasingly incorporates online learning components, educators seek effective ways to engage students outside of traditional classroom settings. Research has shown that short, enthusiastic, and personal videos significantly enhance student engagement and learning outcomes (Guo, Kim, & Rubin, 2014). By creating high-quality key concept presentations, educators can ensure that students are well-prepared for in-class activities and can make the most of their face-to-face time with instructors.
What Does it Look Like in Practice?
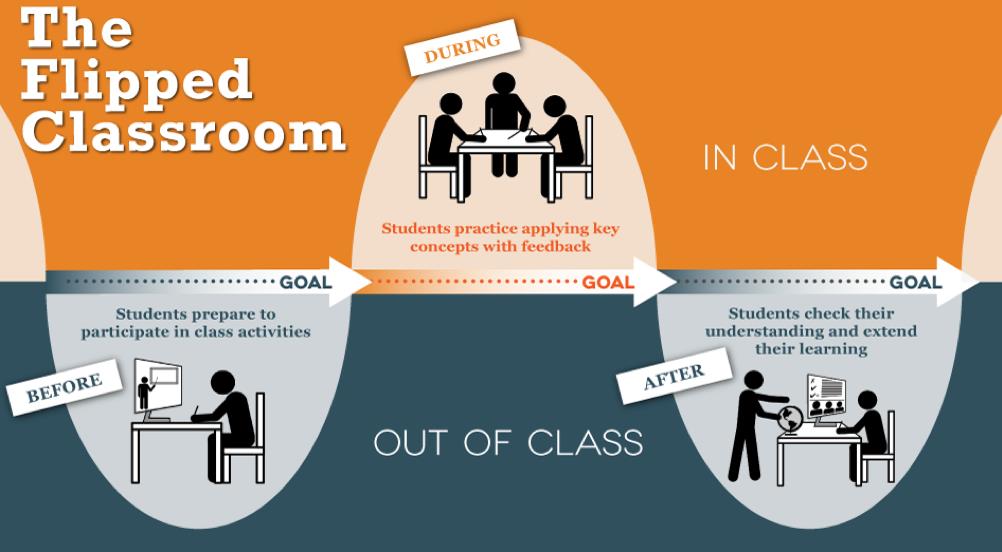
Teaching approaches that integrate face-to-face and online components have become standard in Higher Education. A common approach is the flipped classroom model, where students are exposed to key concepts out of class by watching videos and doing online activities. Subsequent classroom-based activities enable them to practice applying these new concepts under the supervision of educators, maximising the value of face-to-face learning time. After class, students are usually expected to spend more time doing independent work, to check understanding and extend their learning.
Online lecture videos have, therefore, become a key component of university education. But not all video types are equal in terms of student engagement. In an empirical study of 6.9 million views of videos by students studying online courses, enthusiastic and personal videos of less than 6 minutes long, that occasionally show the instructor’s head, were found to be the most engaging (Guo, Kim & Rubin, 2014). We call these short engaging videos “key concept presentations” and in this section, we take you through how you can make your own concise, focused key concept presentations that are accessible and easy to navigate.
In this section:
- Identifying the key concepts
- Providing a hook for your key concept
- Prepare the narrative
- Create new slides
- Using images
- Timeless and independent
- Recording
- Creating accessible video equivalents
Identifying the key concepts

Start by looking at what is being presented in your lectures. The standard lecture can be a journey through the facts, developing a story that leads to a dramatic conclusion – but on closer examination, you will generally see a series of key concepts that are linked to the intended learning outcomes for the course.
If you are using a slide deck for the whole lecture, split your slides into these key concepts by saving separate files as 1.1, 1.2 etc. and then deleting the excess slides to make discrete slide decks. Remember that the key concept presentation doesn’t have to be everything – there are also other online resources (links, videos, articles etc.) that students can draw upon. These resources can be made accessible through the library reserve system or simply placed in the Learning Management System (LMS).
Providing a hook for your key concept
Knowledge is built progressively, and it is important for students to link their new learning to what they already know. Look more closely at each concept in your new key concept slide decks and consider how the concept is being introduced. Can you link it to everyday knowledge through an analogy or metaphor or build on existing knowledge? If so, note this down.
Next, consider how students might apply this key concept by focusing on professional contexts. Consider if there is a way that you can challenge or provoke students with this key concept, perhaps using a focus question or a call to action.

Prepare the narrative
Next, you need to prepare the narrative or script for the presentation – which is generally less than 1000 words – that will lead the students through the key concept, setting the boundaries for what is included in the concept. This will become the audio narration for the presentation. Polish it until it reads well, aiming to say a lot with a little. Once you have your words refined, you can then use Microsoft PowerPoint or any video recording software that may be provided by your institution (e.g., Panopto, Camtasia, etc.) to create your video presentation.
Create new slides
Many institutions have corporate templates for document creation. If using Microsoft PowerPoint to create your slides, you may find a corporate template that is recommended for courses; ideally, you’d want a 16:9 layout, which is best for watching on mobile phones. Importantly, the template should use slide headings appropriately, as these are used by video recording software such as Panopto to automatically create chapters and a table of contents in the video.
Duplicate the appropriate slides in the template and delete any excess slides. Then add the headings for each part of your narrative. Put the corresponding narrative (i.e. the relevant script for each slide) into the notes section of the PowerPoint file.
Read the title and narrative for each slide – what image does it conjure? You may want to use a diagram or photo to illustrate this point (more on using images below).
Read the slide’s narrative and identify any key narrative words to add to the slide. Add these as dot points – limit yourself to 3 words to a point and no more than 5 points. If there are more points, split the content over more slides.
Review the structure of the presentation to ensure it has a title and ending slide as well as an overview and summary – remembering to integrate your hooks to stimulate or provoke the learner. A copyright slide should be included at the end – however, this is primarily for the printable slides and notes version. There should be a copyright notice at the beginning of the video that specifies how the content can be used and who owns the copyright.
Using images
Using images within your presentation is encouraged as well-chosen images help with memory recall and the understanding of concepts. Your images need to comply with copyright laws and include alternative descriptions to comply with accessibility guidelines. Although these image descriptions are not evident in the video version of your presentation, they are visible to screen readers in the slides and notes handout produced from PowerPoint. Advice on copyright is usually available through university libraries.
The simplest way to source appropriate images is to use the built-in image search function in Microsoft Office. PowerPoint has an online image search as well as a SmartArt tool that turns dot points into accessible graphics. Google image search also enables users to select usage rights to “labelled for non-commercial use”. Alternatively, if your institution has an image bank or access to a repository, you may want to search for images in the relevant database. There are many other repositories of free images, including Pixabay and Unsplash, as well as free tools to create simple infographics, such as Canva and Napkin.ai.
Make sure you attribute images on each slide appropriately and note the web address of the image in the slide notes. Include a slide at the end of the slide deck containing all details, such as authors and URL from which the images were obtained.
Timeless and independent
Although it may not always be possible – attempt to make your key concept presentations timeless. By this, we mean avoid using items that will need to be updated, for example, references to textbooks or Standards. If you have to include these details, put this detail on the slide, but not in the narrative as it is easier to update a slide in Panopto than it is to update the audio. Keep a separate spreadsheet that catalogues where these references are so when the inevitable next edition occurs, you know which concepts and slides need to be updated.
It is also a good idea to keep your presentations independent. By this we mean do not include statements like – ‘last week we did this’ or ‘next week we will look at that’ as chances are you will be re-ordering the content sometime in the future and this will need to be re-recorded.
Other tips to increase the longevity and multi-purposing of your key concept presentations include avoiding the use of the course code in your slides as well as week or concept numbers (although you can include these details within file names).
Recording
The next step is recording. You must have a good-quality microphone that is correctly positioned and a quiet environment to do this. Always do a test recording and check the audio after your first recording before attempting to record others. If your institution provides a dedicated recording studio, that would be the ideal choice. Voice-over studios usually have radio-quality microphones and soundproofing on the walls, which lifts the quality of your audio quite significantly. For suggestions on creating the best conditions for recording your videos, you may want to access the chapter Setting Up Your Own Recording Space.
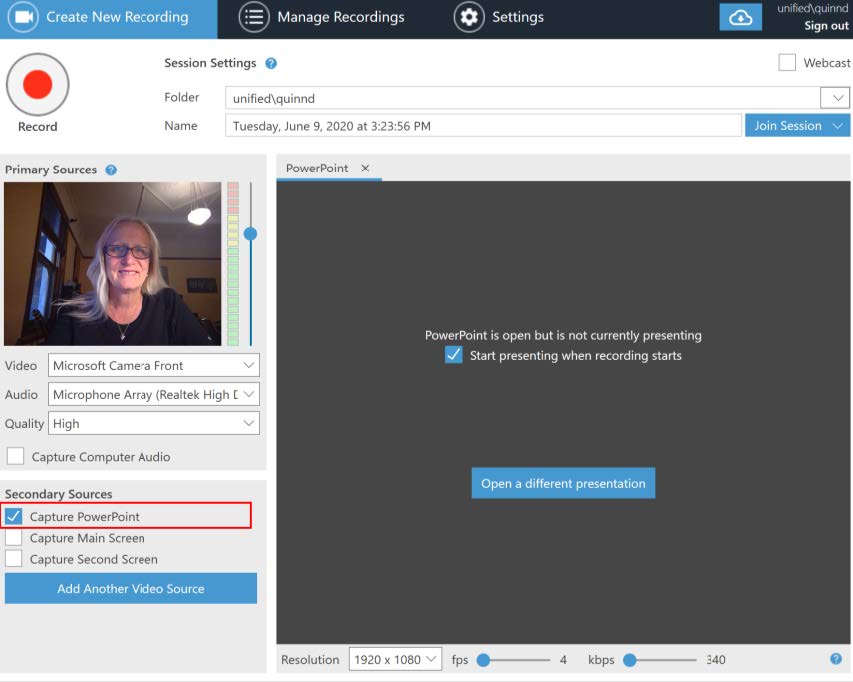
To record your presentation, you can use the slide show recording function of PowerPoint, if that is what you use for creating slides. Alternatively, if your institution recommends specific video recording software, usually they would also provide training and support on how to use it. Video recording software, such as Panopto, enables you to record your slides as well as a video of yourself. This is achieved by selecting two video streams, one for the slides and one for the camera recording you. If you use a webcam as an additional stream in your video, you may also be able to make the output visible only in some segments of your presentation. When recording, be as enthusiastic as you can, conveying your personality as you present.Once you have made your recording, you then need to edit out any stumbles, adjust the security, and add your key concept presentations to your course website.
Creating accessible video equivalents
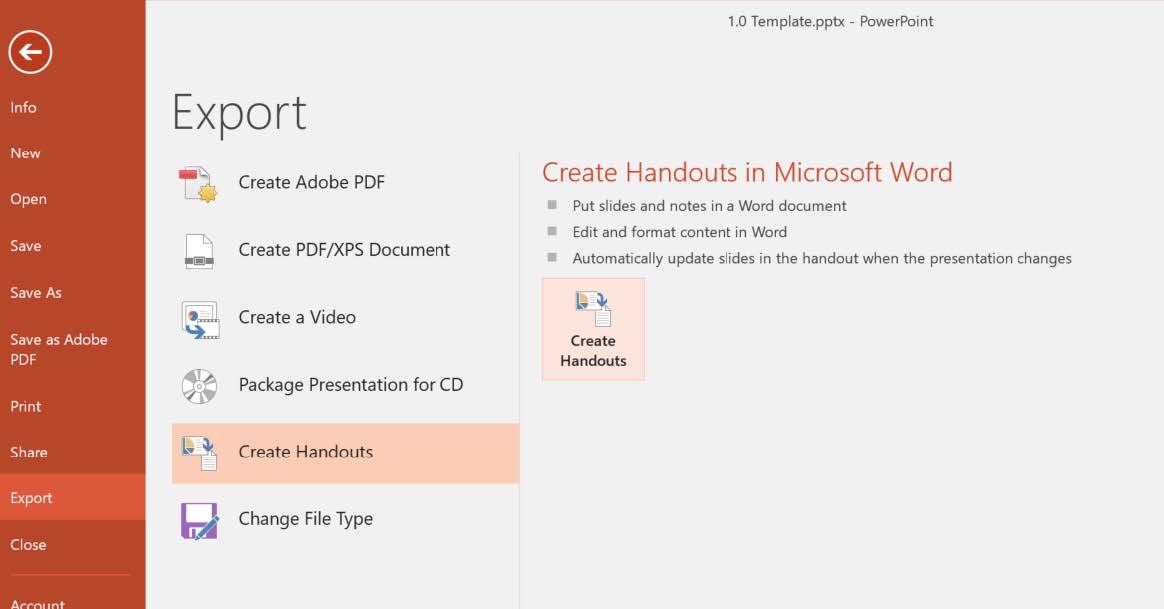
Consider how students’ special needs may be addressed and try and cater to diverse needs by providing content in a variety of formats. Many video recording platforms offer automatic close captioning. It is also best practice to include slides and notes as a PDF, which can be read by text-to-voice applications. To do this in PowerPoint, go to File > Export > Create Handouts > Notes next to (or below) slides. PowerPoint then builds a Word document with slides and notes. This can then be saved as a PDF and uploaded into the LMS. For more suggestions on making your concept presentations accessible, see chapters on Introduction to Learning Design: Frameworks and Approaches, Supporting Linguistically Diverse Students and Supporting and affirming Neurodiversity in your teaching.
Knowledge Check – What Did You Learn?
Test your knowledge by completing the activity below.
What Does It All Mean for Me?
Identify a key concept from a course you are currently teaching. Prepare a brief outline of how you would create a key concept presentation video on this topic.
References
Guo, P. J., J. Kim, and R. Rubin. 2014. How video production affects student engagement: An empirical study of MOOC videos. Paper presented at L@S 2014, March 4–5, 2014, Atlanta, Georgia, USA, <https://dl.acm.org/doi/pdf/10.1145/2556325.2566239>
Media Attributions
- The Flipped classroom © Center for Teaching + Learning, The University of Texas at Austin is licensed under a CC BY-NC-ND (Attribution NonCommercial NoDerivatives) license
- Breaking lecture into concept videos © Generated using Napkin.ai is licensed under a All Rights Reserved license
- Creating engaging presentations © Generated using Napkin.ai is licensed under a All Rights Reserved license
- Panopto recording © Diana Quinn
- PPT export © Diana Quinn
