Part 1 – Teach
14 Using video for self-evaluation of teaching
Antonella Strambi
Most people cringe when watching a video of themselves performing any task. Yet, this is one of the most powerful ways to access real feedback on our teaching practice. In this chapter, we briefly discuss the advantages or using video to evaluate our own teaching and suggest a few simple methods and tools that can be used to get a clear picture of our teaching reality – both literally and metaphorically.
Why Does it Matter?
As briefly mentioned in Navigating Your First Teaching Role, being a reflective practitioner is a fundamental requirement for educators and involves engaging in evaluation of our own teaching practice on a regular basis. To inform our self-reflection and continuous improvement, we need reliable data on our practice. so that we can – as Jim Knight puts it – get a ‘clear picture of reality’ (2021:87). Armed with this information, we can then identify any gaps between where we are at and where we would like to be, and then take action to move closer to our goals and standards.
What does it look like in practice?
In this section:
- Why record a video of yourself teaching?
- Technical tips for recording your video
- Protecting students’ privacy
- Analysing your recorded video
Why record a video of yourself teaching?
Recording oneself while teaching may seem unnecessary. After all, there are other sources of feedback, that is data, on our teaching practice, that we can use to inform our self- evaluations. These may be formal institutional processes as well as more informal opportunities, including peer-reviewing and student feedback through end-of-course evaluations and ongoing feedback tools, such as minute papers. To obtain a well-balanced view of our teaching, ideally, we’d want to gather as much information as possible and from a variety of sources. However, obtaining feedback from other people poses several challenges.
Firstly, it creates a time and effort imposition on others. This means that, realistically, we need to be selective and only request feedback on what matter the most. Therefore, the amount of feedback we can obtain this way may be limited – for example, we may only have one student survey per semester, and only few students may respond to it. Or we might have one peer-evaluation each year and it may only focus on one aspect of our teaching.
Secondly, when other people offer feedback to us, we may become defensive and enact a variety of mechanisms to protect our self-worth. Knight and his colleagues conducted many interviews with teachers about their current practice and found that “educators, just like most other professionals, don’t have a clear picture of what they do” (Knight, 2021:87). This is mainly because of common perceptual errors, such as confirmation bias and habituation. However, defence mechanisms are also involved whenever we feel that our professional competency is under scrutiny and we, perhaps subconsciously, experience peer-feedback as criticism; Table 1 shows four common defence mechanisms.
Table 1: Defence mechanisms that may be triggered when receiving criticism (Reproduced from Knight (2021:89), based on Prochascka, DiClemente, & Norcross (1994))
| Defence mechanism | Definition |
| Denial and minimisation | Choosing not to see unpleasant data |
| Rationalisation | Justifying own behaviour even if our justifications are irrational |
| Blaming others | Excusing our situation by blaming or scapegoating others |
| Blaming ourselves | Failing to acknowledge reality by blaming ourselves for unpleasant occurrences |
One of the most effective ways to overcome these implicit biases and defence mechanisms, as well as obtain sufficient data, is to record ourselves as we teach, and then objectively analyse what we do. This will take us closer to obtaining that “clear picture of reality” (Knight, 2021:87).
Technical tips for recording your video
In the past, video recording a lesson required considerable organisation and specialised equipment. Thankfully, most of us today have very powerful cameras in our ever-present smartphones, which we can use to create perfectly adequate videos. However, depending on the focus of our self-evaluation, we might want to consider different technical requirements. For example, if we are interested in what we say during a lesson, then audio quality would be especially important. In this case, perhaps wearing a lap microphone or a small mp3 audio recorder on a lanyard would be helpful.

If, on the other hand, we are more interested in our body language as we walk around the room, then visual aspects become more important, and we’ll need to consider angles and movement. For this purpose, suitable alternatives might include using an automatic 360-degree swivel stand, a fisheye lens on our phone camera set on a tripod, or asking a colleague to sit in the room and direct the camera to follow our movements. Action cameras, such as GoPro, are excellent devices to use for these purposes, but if they are not available, any smartphone camera may offer sufficient quality video, depending on the identified requirements.
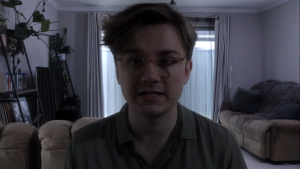
Lighting may also need to be considered, especially when recording from afar and wanting to have high definition, for example to analyse facial expression. If the room has windows, then we’d want to position the camera so that it points away from them, to avoid a backlight effect. Alternatively, curtains or blinds can be drawn to block light coming from windows and artificial lighting can be used to illuminate the presenter’s facial features. To ensure satisfactory results when detail is required, it is useful to do some preparation work that includes trial recording and review, checking that useful footage is produced during recording.
For online classes, recording tends to be easier, as the most common platforms such as Zoom and Microsoft Teams offer the option to record meetings; settings can be adjusted so that only the main speaker is recorded, to protect the students’ privacy.
Protecting students’ privacy
Protecting students’ privacy when recording any class activities is an important consideration. Students must be informed of your intention to record class activities and given the opportunity to opt out of the recording. If they understand that the recording is for evaluation of teaching purposes and that it will only be accessed by you or perhaps a small number of identified colleagues, then usually students are OK with it. If students feel uncomfortable with any aspect of the recording, however, then their concerns must be addressed appropriately.
Activity
If you are not a UniSA staff member, find out which institutional policies and procedures, as well as any relevant legislation, you will need to consider when recording yourself while teaching?
From an institutional perspective, there may be restrictions in terms of what you may record, when, and how, so checking for any relevant policies and procedures before recording is essential. It is also important to be aware of the distinction between data collected for quality assurance purposes, and data that are collected for research or publication. When data are collected for research, there are usually greater restrictions in place to protect human subjects or participants. In Australia, these are laid out in the Australian Code for the Responsible Conduct of Research. Tertiary institutions also have specially appointed committees that ensure any research involving humans is conducted ethically and responsibly.
On the other hand, when data are collected purely for quality assurance purposes, as is the case with self-evaluation, then there are often fewer restrictions in place, provided that the data are not published and that the collection processes are in keeping with any relevant laws (e.g. privacy laws) and ethical principles (e.g. avoiding coercion). Even if you do not intend to use your video recording for research or publication purposes, it would be useful to familiarise yourself with any relevant legislation and institutional policies and seek advice from a representative of your institutions’ Ethic Research Committee, if available, to avoid any issues.
Analysing your recorded video
As previously mentioned, ideally, we would identify the questions that we wish to answer about our teaching early on, so that we can use this information to select the most appropriate recording techniques and tools. Once we have obtained our video footage, we can then look for answers to our questions in the data.
When beginning the analysis process, it is helpful to watch the video recording once without interrupting, for two main purposes. The first purpose is to become at ease with the process and overcome any feeling of awkwardness in watching yourself (which is very common!) The second purpose is to select moments within the lesson that may be useful to focus on – perhaps smaller segments to be used for detailed analysis.
Video is indeed very useful to support micro-analysis of teaching, focusing on specific behaviours and elements of the classroom interactions. For example, if you are frustrated because students remain silent when you ask questions, or they don’t seem to actively engage in the learning process, your analysis could be guided by the following questions:
- How much time, in minutes, is used for student talk during a lesson, as opposed to teacher talk? Do students have real opportunities to speak?
- When you ask a question, how many seconds do you wait for students to answer? Do you call on individual students or let them self-select?
- What kinds of questions do you ask? Are they open- or close-ended? Is the format of the questions you ask appropriate for the types of responses you’d like from students?
- What type of feedback do you give students when they respond? Is it focused on the task outcome (correct/incorrect), on the process and strategies they’ve used to arrive at their response, or on the students themselves (e.g., clever/smart)?
- Is what you see yourself doing aligned with your intentions and what is considered best practice? For example, if you believe that your students should be encouraged to develop a growth mindset, does the feedback you provide align with these intentions?
To answer your analysis questions, simple pen-and-paper methods can be completely appropriate. For example, you could use a table like the one below, which is based on a framework proposed by Knight (2014), to record and classify each question you ask during the video-recorded lesson:
|
Question text |
Type (open v closed) |
Kind (opinion v right/wrong) |
Level of complexity (based on Bloom et al’s (1956) taxonomy) |
The results of this analysis would provide insight into whether your intentions are realised through your in-class behaviours; in other words, you would get a “clear picture of reality” and be able to compare it against your ideal goals.
Sometimes, especially when we are not dealing with a specific problem or challenge and everything seems to go reasonably well, video can be used as an exploratory tool. In other words, we can use video to identify any aspects of our teaching that perhaps we were not aware of, or that intrigues us and prompts us to find out more. A useful analysis tool in this case is a ‘scaling’ question, which is used quite extensively in instructional coaching (e.g., Knight, 2022). An example of a scaling question is, “On a scale of 1 to 10, with 1 being the worst class you’ve taught and 10 being the best, how would you rate this class?” Then, “why did you give it that number? For example, why is it a 7 rather than, say, a 3 or a 4? What is working well?” And “if this class were your dream class, say a score of 10, what would be different?” What would you do if the class were a 10? What would the students do? In as much detail as you can, what would that look like?” (Knight, 2022, 2014)
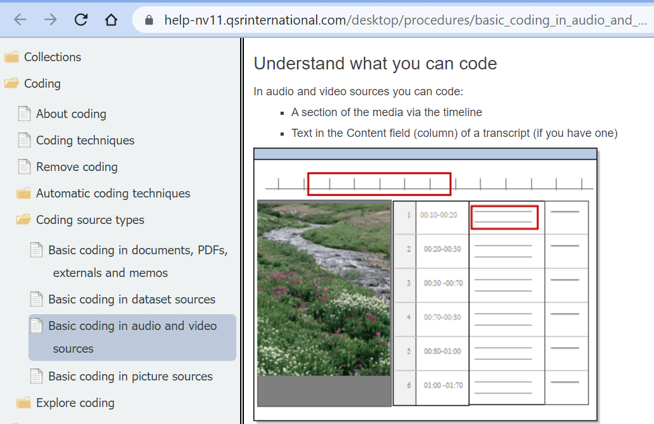
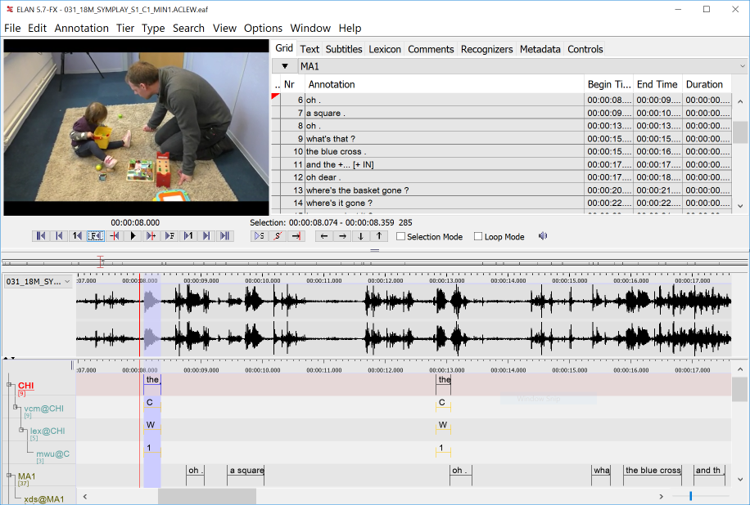
Whether your analysis process is deductive, with pre-determined questions, or inductive, with questions emerging out of the data, you can also use more sophisticated tools designed specifically for video analysis. If you are likely to engage in these processes on a regular basis, and especially if your results will be used for research and publication, learning how to use specialised software may be worth investing time and effort. Qualitative research software such as NVivo support video data, which can be imported and coded by selecting and annotating segments; transcription tools are also provided within NVivo. For detailed micro-analysis of communicative aspects, such as facial expression and intonation, specialised software is also available. ELAN, an open-source video annotation tool developed by the Max Planck Institute for Psycholinguistics, is a good example.
In conclusion, although it may seem a little daunting at first, watching yourself as you teach offers invaluable insight to inform your self-evaluation and reflective practice. Recordings may also be used as data to support Scholarship of Teaching and Learning activities, such as academic publications and applications for teaching excellence awards. Some of the activities listed below may help think through what you would like to achieve and how to organise your recording and video analysis to achieve your self-evaluation goals. If you are unsure about what to look for and how to go about analysing your video data, you may also want to seek advice from an experienced colleague or, if available, the academic development or teaching innovation unit in your institution.
At UniSA….
Resources on policies and guidelines related to Human Research Ethics at UniSA can be found in the Research section of the UniSA website.
Other forms and resources focusing on student privacy include:
- Copyright, Privacy & Sensitive Content in Videos. This resource, hosted in Ask Learnonline, is the most relevant one to the recording of students for pedagogical reasons (e.g. lecture recording)
- UniSA’s Privacy Policy
- UniSA’s Policy on student recording of learning activities
- Consent form template. For research projects that have received approval by the UniSA Human Research Ethics Committee.
For advice on technical requirements for video recording, including what equipment and settings to use, you can book an online consultation with the TIU Media Team.
Similarly, if you would like support with identifying your evaluation focus and questions you want to answer through your video analysis, you can book a consult with a TIU Lecturer: Academic Development.
Knowledge Check – What did you learn?
To reinforce the key points from this chapter, you may want to answer the following comprehension check questions. Model answers are provided for your reference.
What does it all mean for me?
To help you apply the content of this chapter to your own teaching context, consider the following activity. This will guide you through exploring available resources and planning how you might use video to evaluate your own teaching:
Activity: Exploring Resources and Planning Your Self-Evaluation
- Identify Institutional Resources and Policies:
- Investigate what policies and procedures are in place at your institution regarding video recording. Look into privacy laws, ethical guidelines, and any specific institutional policies related to recording classroom activities.
- Locate and review any available resources that support video recording for self-evaluation. These could be technical guides, consent form templates, or institutional guidelines on ethical considerations.
- Answer Key Questions for Your Self-Evaluation:
- Purpose: What is the primary goal of your self-evaluation? Is it for continuous improvement, reflective practice, or research and publication purposes?
- Focus Areas: Are there specific aspects of your teaching practice that you want to explore through video data? For example, classroom interactions, questioning techniques, or student engagement.
- Questions: What questions would you like to answer by watching your recorded lessons? Consider aspects such as the balance between teacher talk and student talk, the types of questions you ask, and the feedback you provide.
- Plan Your Recording:
- Why: Clarify the purpose of your recording.
- What: Determine what specific elements of your teaching you want to capture.
- When: Decide on a suitable time to record your lesson.
- Where: Choose the location(s) where the recording will take place.
- How: Identify the equipment and technical requirements needed for the recording. Consider whether you need additional resources, such as a colleague to help with the recording or advice from an academic developer.
- Communicate with Students:
- Plan how you will inform your students about the recording. Ensure transparency about the purpose and use of the video, and address any concerns they may have.
- Develop an Analysis Framework:
- Create a coding scheme or analysis framework to systematically review your video data. This could involve categorising questions, analysing feedback, and identifying key moments for detailed examination.
References
Bloom, B. S., Engelhart, M. D., Furst, E. J., Hill, W. H., and Krathwohl, D. R. (1956). Taxonomy of educational objectives: The classification of educational goals. Vol. Handbook I: Cognitive domain. New York: David McKay Company.
ELAN (Version 6.7) [Computer software]. (2023). Nijmegen: Max Planck Institute for Psycholinguistics. Retrieved from https://archive.mpi.nl/tla/elan
Knight, J. (2021). The definitive guide to instructional coaching: Seven factors for success. ASCD.
Knight, J. (2014). Focus on teaching: Using video for high-impact instruction. Corwin Press.
NVivo (Version 14) [Computer software]. (2023). Lumivero. Retrieved from https://lumivero.com/products/nvivo/
Further Resources
Hollingsworth, H., & Clarke, D. (2017). Video as a tool for focusing teacher self-reflection. Journal of Mathematics Teacher Education, 20(5), 457-475. https://doi.org/10.1007/s10857-017-9380-4
Tripp, T., & Rich, P. (2012). Using video to analyze one’s own teaching. British Journal of Educational Technology, 43(4), 678-704. https://doi.org/10.1111/j.1467-8535.2011.01234.x
Media Attributions
- Private: Reflection in the mirror is licensed under a Public Domain license
- Private: Presenter light © Teaching Innovation Unit - UniSA is licensed under a CC BY-SA (Attribution ShareAlike) license
- Private: Presenter dark © Teaching Innovation Unit - UniSA is licensed under a CC BY-SA (Attribution ShareAlike) license
- Private: Nvivo screenshot
- Private: Elan screenshot © The Language Archive is licensed under a CC BY (Attribution) license
- Private: UniSA Logo
