Part 2 – Design
21 Setting Up Your Own Recording Space
Maximising Audio and Video Quality in Educational Recordings
Emily Wall
In a Nutshell
Although access to cheap, high-quality recording equipment is on the rise, better gear will only get you so far. The manner in which you use this equipment is just as important, if not more important, than the quality of the equipment itself. Factors such as microphone positioning, lighting, recording environment, and frame size can create a substantial difference to the quality of your video.
In this chapter, we cover some guidelines, techniques, and tips on how to get the most out of your recording space and equipment. We focus on recording with a microphone and webcam at a laptop, but this is universal advice that will apply to most types of recording.
Why Does it Matter?
There are many benefits to creating your educational resources with high-quality audio and video.
Each element of poor audio quality (such as buzzing, reverb, plosives, background noise, etc.) introduces barriers to learning. From a Cognitive Load Theory perspective, these elements have been shown to decrease working memory and increase mental fatigue over time (Mayer, 2017).
Poorly lit and poorly framed webcam footage (as well as poor audio quality) will lower the overall perception of production value which can, in turn, negatively affect the credibility of the presenter and/or organisation (Cummins & Chambers, 2011).
What Does It Look Like in Practice?
In this section:
- Recording location
- Microphone choice
- Microphone positioning
- Lighting
- Camera positioning and framing
Recording Location
Recording in a private, quiet environment is essential. Background noises, whether they come from a busy office space, an open window, or an excitable pet, can act as a considerable distraction to students. Depending on the volume and timing of these noises, and the quality and positioning of your microphone, these noises can also intermix with your voice, making you difficult to understand.
If capturing video, you’ll need to choose a location with adequate lighting. Portable lights can be used if the location is lacking. This will be explained further in the ‘Lighting’ section of this chapter, but you’ll want to keep this in mind when selecting your ideal recording location.
The background of your shot isn’t nearly as important as the available light, but you may wish to add some aesthetic value by choosing a recording location with some textured or coloured walls, art, or bookshelves. Be careful to avoid backgrounds that are distracting; books and art should ideally be far enough away from the camera that titles can’t be read and details can’t be made out.
Microphone Choice
Whilst recording location and microphone positioning (which will be discussed in the next section of this chapter) are generally more important than the quality of the microphone itself, there will be some situations where a microphone’s quality will be too poor to save.
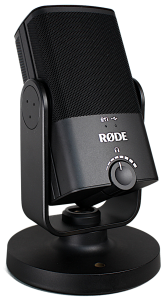
The worst offenders are generally microphones built into webcams and laptops. There are certainly exceptions to this, especially when using more expensive products, but these microphones often run into positioning problems; if the webcam or laptop is currently in use, the microphone is probably placed too far away from the speaker. Laptop fans can also be quite noisy at times, and this can result in very poor-quality audio if the microphone is built into, or very close to, the laptop or computer.
In the vast majority of cases, your best choice for a microphone will be a large condenser USB microphone. These come in a wide range of prices and quality levels, but even budget options should still surpass the quality of other standard types of microphones when recording into a computer (such as headset mics, webcam mics, laptop mics, desk/conference mics).
Microphone Positioning
As mentioned previously, the positioning of your microphone is one of the most important contributors to your overall audio quality. Positioning your microphone well, relative to your mouth, will make your voice sound clearer and more present, and will reduce the volume of unwanted audio effects such as reverb as well as the background noises mentioned in the ‘Recording Location’ section of this chapter.
You’ll want to position your microphone about 15-20cm from your mouth if possible. You’ll also want to avoid placing your microphone directly in front of your mouth, as this can cause popping sounds called plosives.
When choosing which side of your mouth to place the microphone (assuming it isn’t a headset microphone), keep in mind the position of your monitor/webcam/script so that you’re not frequently turning away from or speaking directly into your microphone.
Lighting
If capturing video, you’ll want to make sure your face and shoulders can be seen clearly – this is achieved via camera positioning and framing (which will be covered in the next section of this chapter), and adequate lighting.
Before we go into how best to light your face, it’s worth noting that not having enough light in your shot can lower the quality of the entire video as a whole; most webcams are not designed to shoot in low light and doing so will result in unclear, grainy footage.
As mentioned in the ‘Recording Location’ section of this chapter, lighting may come into play when selecting your recording location. The easiest way to light yourself would be to position yourself with a window in front of you (assuming you’re recording while it’s bright outside). However, windows that are positioned in unideal locations can actually have a negative effect on your image; an open window behind you may cause exposure problems between you and the window as your camera tries to adjust exposure to one or the other. Bright windows/lights behind you may also ‘wash out’ your image (this can be helped slightly by making sure your camera lens is very clean).
If you don’t have access to a location with well-positioned natural light, you’ll need to rely on artificial lighting. Solely relying on ceiling lighting is not recommended as the angle of these lights can be quite unflattering and, in most cases, won’t do a good job of lighting your face. It’s therefore highly recommended to use an external light source in these scenarios, such as a lamp or a specialised video light. These days there are a wide range of cheap video lights designed to be placed on desks for video conferencing or recording purposes. However, you may already have a lamp that is fit for purpose (or you may just prefer the look of a lamp on your desk). Either option is acceptable, but in both cases, you’ll want to consider two things: a) choosing a colour temperature of light and b) the position of your light.
When buying bulbs for your lamp, you’ll generally be given two options: cool white or warm white. They may be named differently but they essentially mean the same thing. Cool white refers to a sunlight-balanced colour temperature: white. Cool white will therefore match the colour temperature of light coming through a window. Warm white will more closely match the colour of a classic halogen or tungsten bulb: yellow/orange. Many video lights will give you the option to change between these two colour temperatures but some are locked to one (generally cool white). Which colour temperature you choose is entirely dependent on your recording location; if there’s a lot of natural light or other cool white lighting, go with cool white; otherwise, if your location has little natural light and the ceiling lights are more of a yellow/orange tint, go with warm white.
Once you’ve chosen your light, you’ll need to position it. Ideally, you’ll want it around eye level. Going above eye level (to an extent) is good as well, but you really want to avoid going under eye level as this will result in what is sometimes referred to as ‘horror lighting’ (think sitting around a campfire telling ghost stories). You may need to raise the stand of a video light or place your lamp on top of a stack of books to achieve this. Then you’ll just want to fine-tune the position so it’s not uncomfortably bright for you to look at but is nicely lighting your face.
Every space is different and, especially if you’re relying heavily on natural light, the lighting required for your space may even change for every recording session. Just be aware of this and give your webcam a quick check after setup. Ask yourself if your face is being lit evenly, if your webcam is exposing properly, and if your image is ‘washed out’ and, if so, is this due to strong backlighting or is your lens just dirty? By asking yourself these questions during your initial setup as well as subsequent setups, you should be able to come up with a system that only needs very minor adjustments (if at all) to achieve lighting that draws attention to you and allows your viewers to see you clearly.
Camera Positioning and Framing
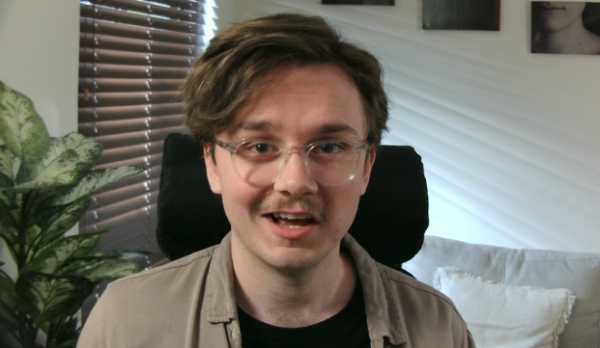
There are many possibilities when it comes to framing yourself in the shot. You might be in a location that is particularly relevant to your recording topic and you want to show it off, or the background may be irrelevant, and you want viewers to focus on you. In this section, we’ll focus on one style of shot that will work in every scenario.
Firstly, let’s look at the height of your camera. You’ll want your camera around eye-level. Similarly to the positioning of external lights, you can go a bit higher than eye-level if needed for your setup, but you rarely want to place your camera too far under eye level. This will make your shot unflattering (your viewers don’t want to see up your nose).
Next, you’ll need to frame up. You should be roughly centred horizontally in the frame with your head and shoulders visible. Don’t worry too much about headroom, but you’ll want your eyes around the top-third mark of the screen. This shot is called a centred medium-closeup (MCU).
At UniSA….
A short tutorial video that summarises many of the points in this chapter can be found in the ‘Panopto’ section of the TIU Website (video 2.1 in the ‘Panopto how-to videos’ section) This video, as well as further information and the below quiz, is available for UniSA staff as part of the Making Media for Teaching and Learning Modules. These modules also contain sections on Multimedia Learning Theory, Slides for Engaging Learners, Presentation Skills, Panopto Training, and Audio Quality and Podcasting.
Information on how UniSA staff can book a media consult with a member of the TIU Multimedia Team is available in the ‘Video production & Multimedia Team’ section of the TIU Website.
Knowledge Check – What did you learn?
What does it all mean for me?
If you’re setting up your space for a recording (or an audio/video conference), whether this be in your home or your office, you can ask yourself the following questions and adjust (or add to) your equipment accordingly to achieve a high-quality product that your students will engage with and understand clearly. You may also want to send your recording to a colleague, or your institution’s Media Team if available, to request their feedback regarding these questions.
- Am I in a quiet, private environment free of distractions? Conversely, are there external factors that may distract my students such as people talking or walking by my shot?
- Is my microphone of an acceptable quality? Conversely, do I have to strain and pay attention to understand the words being spoken?
- Is my microphone positioned well relative to my mouth? Conversely, can I hear excessive reverb or room noises?
- Is my face clearly lit with my webcam exposure balancing my face at a good level? Conversely, is my face dark in the frame or are there windows or lights in frame that are negatively affecting overall exposure levels?
- Am I framed in a centred MCU with my webcam around eye-level or higher? Conversely, am I awkwardly placed in the frame or am I being shot at a strange or unflattering angle?
References
Cummins, R. G., & Chambers, T. (2011). How Production Value Impacts Perceived Technical Quality, Credibility, and Economic Value of Video News. Journalism & Mass Communication Quarterly, 88(4), 737–752. https://doi.org/10.1177/107769901108800404
Mayer, R. E. (2017). Using multimedia for e‐learning. Journal of Computer Assisted Learning, 33(5), 403–423. https://doi.org/10.1111/jcal.12197
Further Resources
Video showcasing the differences certain conditions and situations have on overall audio quality:
https://youtu.be/iDFDOhgSnY4
EPOS article referencing their own study that suggested poor audio quality can result in our brains needing to work 35% harder to interpret information, negatively impacting cognitive load:
https://www.eposaudio.com/en/au/contact/pressroom/press-releases/poor-audio-causes-our-brains-to-work-35-harder-to-interpret-information-epos-study-finds
Media Attributions
- Microphone, Sound © stole1220
- Stage Light, Spotlight, Light © OpenClipart-Vectors is licensed under a CC0 (Creative Commons Zero) license
- Private: Emily Wall © Emily Wall
- Private: UniSA Logo
