Part 1 – Teach
2 Conducting Effective Tutorials
Purpose, Planning, and Engagement
Corinne A. Green
In a Nutshell
This chapter provides practical guidance on how to conduct effective tutorial sessions. It emphasises the importance of being clear about the purpose of the tutorial, which helps in aligning teaching approaches and activities with course objectives. The chapter also introduces the concept of being a ‘good host’ during tutorials, drawing a parallel to hosting a successful dinner party. This involves preparing in advance, welcoming students warmly, assessing the mood frequently, and ensuring everyone feels included. Furthermore, it covers essential elements of tutorial planning and offers various activities and tools to facilitate student engagement and learning.
Why Does it Matter?
As a tutor (or in a similar role), it’s important to be intentional in how you facilitate synchronous tutorial sessions, whether they are in-person, online (e.g., via Zoom), or a hybrid/hyflex combination of the two. The course coordinator may provide varying amounts of information regarding what you are expected to cover in the tutorial session. We recommend that you take this information and make it your own, incorporating your experiences and expertise into the classroom. By following the suggestions provided in this chapter, you can create engaging and productive tutorial sessions that are aligned with course objectives and enhance student understanding and participation.
What Does it Look Like in Practice?
In this section:
- The purpose of a tutorial
- Being a ‘good host’
- Tutorial plans
- Activities and tools
The Purpose of a Tutorial
Being clear about the purpose of the tutorial session will enable you to align your teaching approach and will inform the types of activities that you facilitate. In general terms, tutorials are opportunities for discussions and interactions between students and with the tutor about the course content and how it can be applied.
Tutorials are spaces where students interact with their peers and their knowledgeable tutor to develop their understanding and potentially apply their knowledge to relevant situations. You may be seeking to build a shared understanding or a common viewpoint – or perhaps to highlight differing perspectives within the cohort and the broader community. Collaboration is common, as are opportunities for feedback and dialogue.
The specific purpose of a tutorial may differ depending on the context – the discipline, the level of the course, the content, etc. There should be clear links between the course objectives and the tutorial purpose – that is, what you do in the tutorial should help students achieve the course learning outcomes.
When you’re clear about the purpose of the tutorial, you’re better placed to implement activities that are aligned with that purpose.
Being a ‘Good Host’
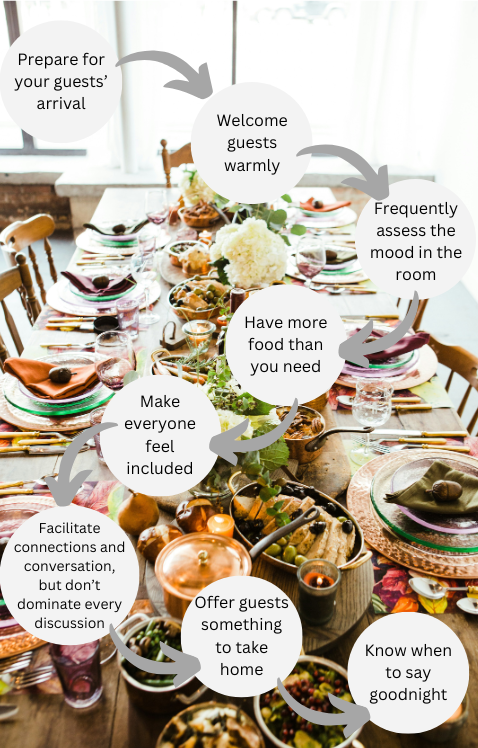
A compelling metaphor for how to facilitate tutorial sessions is given by Finkelstein (2006): an effective tutorial facilitator is like the host of a successful dinner party. While Finkelstein focuses on facilitators of synchronous online sessions, we believe the analogy holds true for any synchronous tutorial.
As a ‘good host,’ you should ensure that your students feel welcome, comfortable, and engaged. This involves creating an inclusive and supportive environment where students can freely discuss their ideas, ask questions, and participate in collaborative activities. Just as a good host ensures that their guests are well-cared for and that the conversation flows smoothly, a good tutorial facilitator should manage the session dynamics effectively, encourage participation, and provide timely feedback.

Click on each ‘good host’ behaviour to read more about how it applies to managing tutorials effectively.
Prepare for your guests’ arrival
Have the resources that you plan to use ready in advance so that you can begin on time. When learners arrive, you want to be able to focus on them and on the content and collaboration at hand.
Welcome guests warmly
As people log in or enter the room, welcome each person by name if possible. In addition to being a warm way to begin, it sets a tone and reminds learners that you know they are present and that their participation will be expected.
Frequently assess the mood in the room
Periodically gauge comprehension and mood by asking quick poll questions, soliciting reactions (e.g., raise hands or use emoji), or calling on learners for feedback. Waiting until the last few minutes leaves little opportunity for adjustment.
Have more food than you need
Prepare more activities than you think are needed for the time allotted. It is better to have a few planned activities left over for next time than to be short of things to do together as a group, thereby causing learners to question why they needed to carve the same hour out of their day. Alongside this note from Finkelstein, we’d like to acknowledge that over catering can be wasteful – so we suggest keeping this in moderation.
Make everyone feel included
Try to recognise and solicit contributions from as many learners as possible and refer to comments made by the name of the person who shared them. This is more important when multiple voices can be heard at once and some can be lost in the mix.
Facilitate connections and conversation
Use your role as facilitator to foster an environment where learners are exchanging ideas with others and seeing their peers as resources for ongoing learning. If a lecture is needed, consider recording it and posting it to a course site for anytime viewing rather than doing it live within the tutorial.
Offer guests something to take home
You could, for instance, post handouts, slides, transcripts/recordings of a live session, or the results of group activities as on-demand resources within a course site. These convenient take-aways help reinforce new knowledge constructed or shared during the experience. You might also encourage students to identify something that they learned during the session; what are they taking away from this time together?
Know when to say goodnight
End on a high point. Don’t cram too much into a live session or preside over unnecessarily long goodbyes. If a session peters out, learner attention will diminish quickly and goodwill can suffer. Conclude at a high-energy level to propel learners to do their follow-up work and keep them excited about the next live session.
Tutorial Plans
The course coordinator likely has a picture in mind of what they want covered in each tutorial, how, and why. Hopefully, they communicate this with the teaching team (including you as a tutor)! This may be via a structured lesson plan or tutorial guide document, through a slide deck with associated notes, or perhaps given more informally.
In general, the following pieces of information are really helpful for tutors to bring the tutorial plan to life:
- Overarching Goal/Focus: Priming the tutor (and the students as well, if shared) about the relevance and focus of the tutorial.
- Instructions for Activities: Including anticipated timing of the tasks and what might need to be set up ahead of time to make best use of the tutorial session.
- Resources: Making clear whether these will be provided by the course coordinator, or if tutors need to prepare these ahead of time.
- Notes for Tutors: Opening up the conversation among the teaching team, for instance highlighting common mistakes students often make with this material, how tutors should be directing the discussion, key points to draw students’ attention to, and the priority of activities (e.g., required vs. optional activities).
If you have not been provided with this information for the tutorials that you facilitate, we recommend reaching out to the course coordinator. You can also develop a more structured lesson plan based on the information the course coordinator provides if that is useful to you.
It’s helpful to remember that someone with substantial teaching experience may only need minimal notes for themselves, while someone who is newer to teaching can benefit from preparing and referring to more explicit notes that guide them through the tutorial session.
Activities and Tools
Once you know what the purpose of the tutorial is and what the course coordinator expects you to cover, you can consider what tools and activities will facilitate students’ learning. It’s a good idea to practice beforehand – even asking colleagues to act as your students – so you know what to expect during the tutorial.
Remember: it’s not about chasing all the shiny balls! Consider what you want students to do and why, then choose the best tool for the job (rather than finding some shiny new tool and shoehorning it into the tutorial, whether it fits there or not). When you’re introducing a new tool or technique, give students some time to learn how to use it before getting started on the activity.
If you want… then try…
Here is a list of goals you might have for your tutorial. Clicking on a goal will display a strategy that might be useful to achieve that goal.
If you want…
Students to answer a question
Give them time to think, and multiple ways to respond. Students may be more willing to share their initial thoughts with one or two peers, via text chat, or by adding ideas to a class mind map (whether physical, e.g., post-it notes or whiteboard, or digital, e.g., a Padlet or Miro board).
Students to discuss a prompt in small groups
Form groups (e.g., by table for in-person; using breakout rooms if online) and set a specific task with guidance around timing. Use cloud-based documents to keep an eye on how the groups are progressing, and have groups report back to the whole class at the end of the activity. Inform students how they can seek your input, and float between groups (whether in-person or online) to facilitate connections and conversations as needed.
To know what students are having trouble with
Start the session with a prompt such as “Share your most interesting insight/biggest challenge from…” or “If there is one thing you want me to cover again, what would it be?” Responses can be collected anonymously (e.g., via MentiMeter or a poll). Identify common themes in the responses and use them to adjust the pacing or focus of the tutorial. It’s a good idea to feed these back to the course coordinator as well.
Students to showcase their knowledge
Have students prepare a 5-minute presentation to deliver during the tutorial. Encourage the rest of the class to ask questions to extend the discussion.
Students to hear other perspectives
Invite a guest speaker to the tutorial session. Have them give a short presentation, then invite students to pose questions and interview them.
Students to catch up on reading without wasting tutorial time
Have students answer questions about the reading during the tutorial using tools such as polls, Padlet, or other interactive platforms. Use the patterns and answers collected to spark further discussion.
To conclude the session
Encourage students to identify what they have learned from the tutorial, whether and how they have met the intended goal for the tutorial, and/or what action they will take between now and the next tutorial. This could be shared with a peer, via text chat, collected anonymously (e.g., via MentiMeter or a poll), etc.
Knowledge Check – What Did You Learn?
To reinforce your understanding of conducting effective tutorials, please answer the following questions:
What Does It All Mean for Me?
Reflecting on this chapter, consider how you can apply the principles of effective tutorial facilitation to your own teaching practice. Here is an activity to help you integrate these concepts:
Activity: Plan and Conduct a Tutorial Session
References
Finkelstein, J. (2006). Learning in Real Time: Synchronous Teaching and Learning Online. Jossey-Bass.
Media Attributions
- White flowers on white ceramic plate on table © Brooke Lark adapted by Candice Mitchell is licensed under a CC0 (Creative Commons Zero) license

